If you are facing a problem which is similar to below scenario, then the following proposed solution is for you.
Scenario
User is using your App in his mobile phone or any other device.
During that someone is created a new record in your data-source from Model Driven App (or any other place).
And your Canvas App is not bringing that new record for that user.
Solutions
Ifyour Gallery’s data-source is a “Collection” and you are populating that collection somewhere, then your expressions should be in the following sequence.
Polymorphic lookups (like Regarding in Dynamics 365) are great—until you can’t pick records from your custom table or even system tables like Users. Frustrating, right? Here’s a quick checklist to get you back on track:
1. Check Custom JavaScript 🚫
Custom JS might be blocking your lookup. Disable any scripts on the form and test again.
2. Confirm Table is in Your Model-Driven App ✅
Open your app in the Modern App Designer (with Admin access). Is your missing table listed under Tables? If not, add it!
3. Use Classic Designer if Needed 🕰️
If the modern designer won’t let you add that table, switch to the Classic App Designer and add it there.
Quick Recap
Polymorphic lookup dropdown depends on your app’s table list.
When you enable “Create a New Activity” for a custom Dataverse table, the platform automatically creates several activity-related relationships (Task, Email, ActivityPointer, etc.). This works fine in your current environment, but when you export the solution and import it into another environment, you may run into errors like:
“The entity relationship role of the referencing entity is required…” “The referencing entity must have the CanBeRelatedEntityInRelationship property set to true.”
These errors appear because the solution is missing important metadata connected to the activity relationships that Dataverse generated automatically.
👉 Root Cause
Enabling “Create a New Activity” causes Dataverse to create new 1:N system relationships between your custom table and several Activity tables, such as:
ActivityPointer (Activity)
Task
Email
Phone Call
Appointment
Any other custom activity entity
When exporting your solution, the relationship metadata might be included, but the Activity tables themselves are not — causing the import to fail since the target environment cannot recreate these relationships without the updated metadata.
✅ Fix
To successfully import the solution into another environment, include all components involved in the new activity relationships.
Add these to your solution:
Your custom table metadata (Mandatory)
Ensures the “Create a New Activity” setting is included.
All activity tables are involved
Activity (ActivityPointer)
Task, Email, PhoneCall, Appointment (Optional)
Any other activity entity Dataverse linked automatically (Optional)
Auto-generated 1:N activity relationships
Example:
yourTable_ActivityPointers
yourTable_Tasks
yourTable_Emails
Once all these pieces are included, the solution imports cleanly across environments.
💡Summary
If you enable “Create a New Activity” on a custom table, Dataverse creates several system-managed activity relationships. These relationships depend on the Activity and Task tables, so you must include:
✔ Your custom table metadata ✔ ActivityPointer + specific activity tables ✔ Auto-generated relationships
Adding these components ensures smooth solution imports and prevents frustrating metadata errors.
In this blog, I’ll demonstrate the steps and procedures required to configure Azure API Management Service (APIM) instance for D365 F&O custom services to enable monitoring and analytics for service callings and consumptions. Here, I’m assuming that you have already created and deployed your “Service” and “Service Group” in your D365 F&O application.
You can validate that your custom service is up and running by execute the following URL in your browser and it should return a metadata of your service: “Https://[D365FOURL]/api/services/[YourServiceGroup]/[YourService]”
APIM Service Configuration Steps
1.App Registration
First, we need to create a new App Registration in Azure for our D365 F&O application with client secret. Follow below steps:
Click on “+New Registration” to create new App registration.
Fill out the following values as per your requirement and hit “Register” button.
Fields
Values
Name
Give name to your App registration (i.e. APIM-App-Registration)
Supported account types
Select account types (i.e. Account in this organizational directory only)
Redirect URL
Leave it blank for now (we’ll configure it later)
1.1. API Permission
Go to “API Permissions” and add the following delegated permissions.
1.2 Add Certificates & secrets
Go to “Certificates & secrets”.
Click “+ New client secret” to add new client secret.
Fill out the values and hit “Add” button.
Please note the generated client secret value somewhere, we’ll need it later.
2. API Management Service
Now we are going to create API Management Service instance to call APIs with monitoring and analytics capabilities.
Navigate to “API Management services”.
Click on “+New” to create new APIM service instance.
Fill out the following values.
Fields
Values
Subscription
Select your azure subscription
Resource group
Select resource group (you can create one as well)
Region
Select your region (Default East US)
Resource Name
Enter Logical Name for your APIM resource (i.e. APIM-Resource)
Organization Name
Enter your Organization Name (i.e. Microsoft)
Administrator Email
Enter Administrator Email (i.e. AdministratorEmail@Microsoft.com)
Pricing Tier
Select pricing tier (Developer (no SLA) by default) Learn more
Click “Review + create” to review APIM settings
Click “Create” to create API Management Service (Have patience APIM creation will take around 10-25 minutes)
2.1. Add Product
Once APIM instance is created, we need to add a product in our Azure APIM instance to get subscription keys while sending requests to our API. Follow below steps to add a product in your Azure APIM instance.
Open your APIM instance, go to “Products” section.
Click “+Add” button to add a new Product.
Fill out the following values.
Fields
Values
Display name
Give name to your product (i.e. D365FinsOps)
Id
Auto-generated id based on your product display name (i.e. d365finsops)
Description
Give description to your product (i.e. Dynamics 365 Finance and Operations)
Published
Published (i.e. Yes)
Requires subscription
Requires subscription (It will create subscription keys for your products to be used later)
Requires approval
Requires approval (i.e. No)
Subscription count limit
Leave blank
Legal terms
Define your legal terms
2.2. Add OAuth 2.0 Service
Now we need to create “OAuth 2.0 connection” for our registered App and we’ll use this connection later. Follow below steps to add “OAuth 2.0” service connection in your Azure APIM instance.
In your APIM instance, go to “OAuth 2.0 + OpenID Connect” section.
Click “+Add” button
Fill out the following values and hit “Create” button.
Field
Values
Display name
Give name to your OAuth 2.0 (i.e. APIM-OAuth2-Connection)
Id
Auto-generated id based on your display name (i.e. apim-oauth2-connection)
Description
Give description to your product (i.e. APIM OAuth2 service connection)
Paste your D365 Fin & Ops application URL with suffix “/.default” (i.e. [D365FOURL]/.default)
Client credentials (Client ID)
Navigate to your App Registration that we have created at “Step 1” and Go to “Overview” and Copy “Application (client) ID” value and past it here (i.e. xxxxxxxx-xxxx-xxxx-xxxx-xxxxxxxxxxxx)
Client credentials (Client secret)
Paste “Client secrets value” that we created at “Step 1.2” (i.e. xxxxxxxxxxxxxxxxxxxxxxxxxxxxxxxx)
2.3. Add API
Now, this is the main part where we define our custom service and its operations to be called as an API.
In your APIM instance, go to “API” tab.
Select “+Add API”
Click “Blank API”
Fill out the following values and hit “Create” button.
Field
Values
Display name
Give name to your API (i.e. Custom Service)
Name
Auto-generated name based on your display name (i.e. custom-service)
Web service URL
Paste your D365 Fin & Ops application URL in the following format [D365FOURL]/api/services/[Your Service Group]/[Your Service]
API URL suffix
Give APIM URL suffix (i.e. custom-service)
Now, select your API “Custom Service”
Go to “Settings” and update the following values and hit “Save” button.
Field
Values
Tags
Define your API tags (i.e. D365)
Products
Select Product that we have created at “Step 2.1”
Gateways
Select Gateways (i.e. Managed)
Subscription required
Subscription required (i.e. Yes)
Header name
Define header name (i.e. Ocp-Apim-Subscription-Key)
Query parameter name
Define query parameter name (i.e. subscription-key)
User authorization
Select OAuth 2.0
OAuth 2.0 server
Select OAuth 2.0 server that we have created at “Step 2.2” (i.e. APIM-OAuth2-Connection)
2.3.1. Add Operation
Now we add an operation to our API to define our service method.
In your APIM instance, go to “API” tab.
Select your API “Custom Service”
Go to “Design” and Click “+ Add operation” button.
Fill out the following values and hit “Save” button.
Field
Values
Display name
Give name to your API (i.e. getTestService)
Name
Auto-generated name based on your display name (i.e. gettestservice)
URL
Give your FinOps custom service method name here (i.e. Get /getTestService)
Description
Give description to your product (i.e. Get customer name)
Tags
Define your API tags (i.e. D365)
2.4. Add Redirect URI
Here we’ll define redirect URIs for our App Registration those will be used by our API to get authorization codes.
Navigate to App Registrations and open App that we have registered at “Step 1”
Go to “Authentications”.
Click on “+ Add a platform” to add “Redirect URIs”
Though you can test API from your APIM instance, but a better way to test your API is from “Developers Portal”. Let’s see the steps to test your API from Developer Portal.
2.5.1. Publish Developer Portal
For the first time, we need to publish developer portal for our APIM instance.
Go to “Portal overview” section.
Publish Your Developer Portal.
2.5.2. Open Developer Portal
Go to “Overview” section.
Under “Properties” tab, go to “Developer portal”.
Open Portal in “Administrative interface” mode.
Click on “Developer Portal” to access your portal.
Navigate to “APIs”, there you should be able to see your Custom API.
Click on your API.
Select Operation and Click on “Try it”
Define following values and hit “Send” button to call your custom service as an API.
Section
Field
Value
Headers
Ocp-Apim-Trace
It should be “true”
Ocp-Apim-Subscription-Key
It’ll be auto-populated from “Subscription key” value under “Authorization” section.
Authorization
It’ll be auto-populated from “Access Token” acquired by “APIM-OAuth2-Connection” value under “Authorization” section.
Authorization
APIM-OAuth2-Connection
Select “Authorization Code” to acquire access token.
Subscription key
Select “Primary subscription key” from your APIM product.
Request URL
Request URL
It will be your APIM URL for this particular API and it will be used by external sources to consume your API. (i.e. Https://[APIM instance name].azure-api.net/custom-service/getTestService)
HTTP request
HTTP request
A complete HTTP request (Here, you can pass parameter values to your service method and set other values in your request)
You should receive a response with status “200 Ok” and metadata of your service method in response content.
Conclusion:
You can follow above steps to configure Azure API Management service to introduce monitoring and analytics capabilities between your “D365 F&O custom service” and “your service callers/consumers”.
Recently, I have encountered the following exception in my Power Apps – Canvas App.
The requested operation is invalid. Server response: [Datasource name] failed: An error has occurred. Object not set to an instance of an object. ClientRequestedId: [#GUID]
Canvas App
If you are also facing this exception in your Canvas Apps, then the following proposed solution is for you.
Exception:
Actually, you are facing this exception because you are passing a “null” value to your Canvas App “function” (Filter/LookUp/Search etc.). All you need to do is to check your value before calling a function.
Solution:
To avoid this exception, just make sure you are writing your expressions in a correct way.
In the previous part, we have seen a data validation approach for Canvas App scanner while we were dealing with small data volume. In this part, we’ll see a validation approach that we should take when we are dealing with large data volume.
Scenario: You are validating that the scanned product Id is a valid product Id in your Fin & Ops application. Because, in Fin & Ops we can expect large number of products. So this sort of validation required some extra care to maintain accuracy.
So let’s see that approach with example.
My Canvas App
We are using the same Canvas App that we have used in Part 1 of this series. We have added another scan screen for Product and we’ll perform a validation for a scanned product Id.
“Scanned Product ID” will show a product Id that you’ll scan from a barcode. “Valid Product” will show “Yes”, if the scanned Product is a valid Product, it will show “No” for invalid Product.
Validation Approach:
To avoid validation inconsistencies while dealing with large data, we should first load the data in a collection and then we should use that collection for validation.
1) On “OnStart” Action of your App, write the following expression. Clear(<Collection name>);Collect(<Collection name>,<Datasource name>);
2) On “Text” property of “Valid Product” value box, write the following expression. If(IsBlank(LookUp(<Collection name>, <‘Column name’> = <‘Scanner Control Name’>.Text )), “No”, “Yes” )
That’s it! Though, “OnStart” action will take few seconds to load the data in your collection. But this approach will be accurate and validation will be super fast.
In this series we have learned some simple techniques to accurately validate the data that we are scanning from a Canvas App scanner. We’ll see more Canvas Apps techniques and approaches in our upcoming blogs. So stay tuned !
Adding a barcode scanner in your Canvas App is quite common requirement now and whenever you scan something, you need some sort of validation for the scanned values.
As far as I experienced, validation approaches for Canvas App scanner value are different based on your data volume.
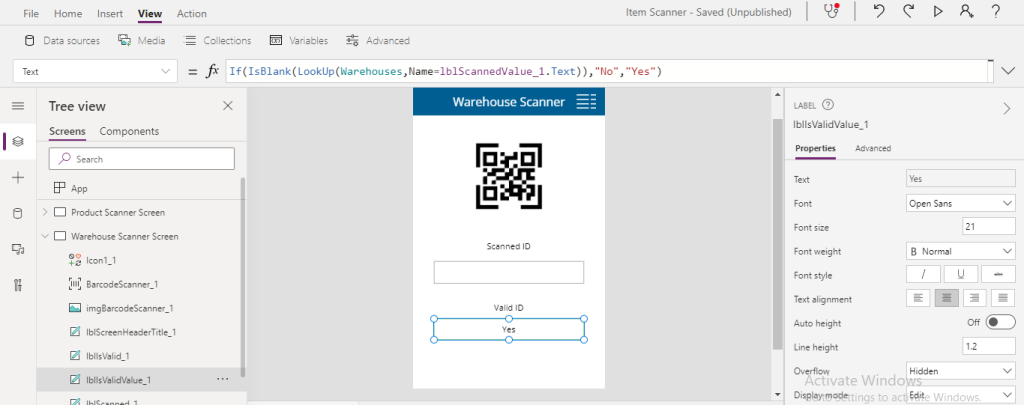
Scenario: You are validating that the scanned Warehouse name is a valid Warehouse in your Fin & Ops application. Because, in Fin & Ops generally we can’t expect large number of warehouses. So this sort of validation required comparatively simple approach.
So let’s see that approach with example.
My Canvas App
To demonstrate this scenario, I have created a simple Canvas App with a scan screen for Warehouse and we’ll perform a validation for a scanned warehouse name.
“Scanned Warehouse Name” will show a warehouse name that you’ll scan from a barcode. “Valid Warehouse” will show “Yes”, if the scanned warehouse is a valid warehouse, it will show “No” for invalid warehouse.
Validation Approach:
If you are dealing with small data volume like our example, then you can easily use below expression On “Text” property of “Valid Warehouse” control to validate the scanned warehouse name. If(IsBlank(LookUp(<‘Datasource name’>, <‘Column name’> = <‘Scanner Control Name’>.Text ))), “No”, “Yes” )
It’ll work fine as far as your data volume is small in your data-source (“Warehouses” in our case).
Note: I’m assuming that you’re aware that you can only test barcode scanner in your mobile device as of now.
But if you are dealing with large data volume so you need to take another way to maintain validation accuracy. We’ll see that approach in our next blog.
Whenever you add a new custom field to a payment journal, so then it’s become very important to flow that field to the posted transaction tables as well when that journal gets posted.
So today I’ll show you how you can implement a logic to flow a custom field from posted payment journal to a vendor/customer transaction table in D365 F&O using extensions and COC pattern.
VENDOR TRANSACTION
Add a field (xyzExpenseCode) to the extensions of the LedgerJournalTrans table and LedgerJournalTransVendPaym form.
Now add a field (xyzExpenseCode) to the extensions of the VendTrans table and form.
Create an extension of VendVoucher class (VendVoucherxyz_Extension) to wrap the initCustVendTrans method to define the following mapping between journal and vendor transaction fields.
protected void initCustVendTrans( CustVendTrans _custVendTrans, LedgerVoucher _ledgerPostingJournal, boolean _useSubLedger) { next initCustVendTrans(_custVendTrans, _ledgerPostingJournal, _useSubLedger); VendTrans vendTrans = _custVendTrans as VendTrans; // Get vendTrans table buffer form CustVendTrans map instance If (common == ledgerJournalTrans ) { LedgerJournalTrans ledgerJournalTrans = common; // Get journalLine table buffer vendTrans.xyzExpenseCode = ledgerJournalTrans.xyzExpenseCode; // Define mapping for custom fields } }
CUSTOMER TRANSACTION
Add a field (xyzExpenseCode) to the extensions of the LedgerJournalTrans table and LedgerJournalTransCustPaym form.
Similarly, add a field (xyzExpenseCode) to the extensions of the CustTrans table and form.
Lastly, create an extension of CustVoucher class (CustVoucherxyz_Extension) to wrap the initCustVendTrans method to define the following mapping between journal and customer transaction fields.
protected void initCustVendTrans( CustVendTrans _custVendTrans, LedgerVoucher _ledgerPostingJournal, boolean _useSubLedger) { next initCustVendTrans(_custVendTrans, _ledgerPostingJournal, _useSubLedger); CustTrans custTrans = _custVendTrans as CustTrans; // Get custTrans table buffer form CustVendTrans map instance If (common == ledgerJournalTrans ) { LedgerJournalTrans ledgerJournalTrans = common; // Get journalLine table buffer custTrans.xyzExpenseCode = ledgerJournalTrans.xyzExpenseCode; // Define mapping for custom fields } }
Now when you post a payment journal, so along with all other fields your custom field will also move to the respective transaction tables.
In this session, I’ll share my knowledge that how can we add a new cheque format in D365 F&O through extensions and handlers.
Mandatory Steps:
Open Visual studio and create a new Dynamics365 project.
Now, create a report (xyzCheque_US) to design it as per your requirement (you can also duplicate any existing cheque report and make the required changes like I did).
Design it as per requirement
Create a new output type Menu-item (xyzCheque_US) and set the following properties.
Menu-item
Menu-item properties
Create an extension of base enum CheckFormType (CheckFormType.xyzExtension)
to add a new option (xyzUSStyle) for your cheque format.
Extended Enum
Cash and bank management > bank accounts > bank accounts > layout > Check > Check form
Now we need to create some classes to execute this newly created cheque format.
1.Create xyzBankChequePrintHandler class and add a following handler for a provided delegate.
[SubscribesTo(classStr(BankChequePrint), delegateStr(BankChequePrint, printDocumentDelegate))] public static void determineReportMenuOutput(ChequeFormType _chequeFormType, EventHandlerResult _eventResult) { if (_chequeFormType == ChequeFormType::xyzUSStyle) { _eventResult.result(menuItemOutputStr(xyzCheque_US)); } }
2. Create xyzChequeControllerHandler class and add a following handler.
3. Create xyzCustVendChequeTxtCalHandler class and add a following handler.
[SubscribesTo(classStr(CustVendChequeSlipTextCalculator), delegateStr(CustVendChequeSlipTextCalculator, getChequeDocLengthDelegate))] public static void getChequeDocLength(ChequeFormType _chequeFormType, EventHandlerResult _eventResult) { const real ChequeSizeDefault = 88.89; // define as per your requirement if (_chequeFormType == ChequeFormType::xyzUSStyle) { _eventResult.result(ChequeSizeDefault); } }
4. Create an extension class BankPrintTestChequexyz_Extension of BankPrintTestCheque class and add the following two methods (here we will be using COC pattern to execute our logic).
protected void runChequePrintForExtendedChequeFormType(TmpChequePrintout _tmpChequePrintout) { next runChequePrintForExtendedChequeFormType(_tmpChequePrintout); if (_tmpChequePrintout.ChequeFormType == ChequeFormType::xyzUSStyle) { Args args = this.getChequePrintArgs(_tmpChequePrintout); new MenuFunction(menuitemOutputStr(xyzCheque_US), MenuItemType::Output).run(args); } }
Recommended Steps:
Although below steps are optional but these are recommended to avoid BP errors and to follow best practices.
Create a new Privilege (xyzBankChequeGenerate) and drag your menu-item (xyzCheque_US) to its Entry points to set the required security for this menu-item.
Create an Extensions of PaymVendorPaymentsMaintain and BankBankTransactionsMaintain duties and add new privilege (xyzBankChequeGenerate) to these existing duties.
Now, deploy your report, run your project and test this newly created cheque format by following this link.